Successful nutrient management begins with soil sampling
Soil analysis and fertilizer recommendations are only as good as the samples you submit.
Now that spring is here, many growers will be heading to the field, probe and bucket in hand, to sample their soils. Soil testing is a vital first step toward successful nutrient management. Analysis results indicate the concentration of nutrients present in the soil, as well as any deficiencies that could potentially limit plant growth. Using this information to inform fertilizer application most often results in healthier, higher yielding crops. Soil testing also contributes to efficient fertilizer use that maximizes return on investment and protects the environment. That said, soil analysis and fertilizer recommendations are only as good as the samples submitted to the lab. The way that samples are collected can impact how accurately they represent the soil in question.
Sample uniform areas
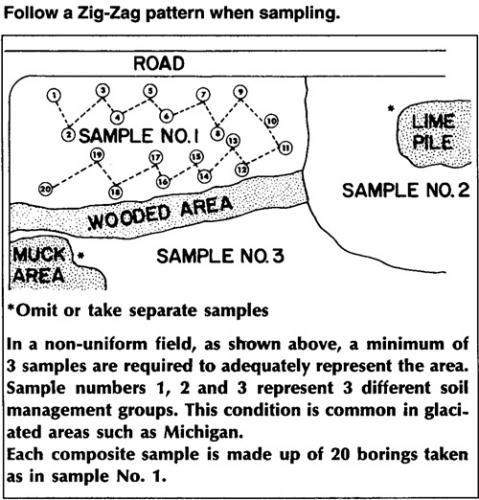
Soil samples are small examples intended to reflect the nutrient status of a much larger management zone. In general, one composite sample of 20 cores mixed together can be used to represent 10 to 15 acres. However, differences in soil type, texture, drainage, topography and management occurring across a field should all be considered when delineating sampling areas. Building each composite sample with subsamples from a relatively uniform area increases the likelihood that the soil in your bucket accurately represents the rest of the management zone.
Soil survey maps are an excellent reference to the basic variability in a field. Field history records can provide additional information regarding crop rotation, fertilizer or manure application, and yield patterns. It is also important to note any atypical areas such as field edges near roadways or spots where lime or manure were once piled. Incorporating all of this information in a simple field map will make it much easier to identify uniform soil areas for sampling.
Sample collection
Soil samples can be taken using a probe, auger or spade. Probes and augers are handy because they extract a standard volume of soil, but a spade can do the same with a little extra effort. Subsamples should be collected and mixed in a clean, plastic pail. It is best to avoid metal containers due to their potential to contaminate samples.
Research has indicated that moving through each uniform sampling area in a zigzag pattern will generate the most representative sample. Select 20 evenly distributed sampling sites along the sampling pattern to visit (Figure 1). At each site, brush aside any crop residue, remove a core or slice of soil approximately 0.5 to 0.75 inches think and add it to your bucket. Take each sample at a consistent depth to accurately reflect the vertical distribution of nutrients. In tilled fields, sample to the average depth of tillage. No-till or reduced tillage fields should be sampled to 8 inches.
Figure 1. Soil sampling.

Credit: Darryl Warncke, MSU
Once all 20 subsamples have been collected from a particular sampling area, thoroughly mix the cores into a uniform composite sample. If the soil is wet it may be necessary to dry it before mixing. After the sample is mixed, take a minute to sift through it and remove any foreign material. Finally, place approximately one pint of the soil into a sample box or bag for submission to the lab. Soil sample boxes and bags can be obtained from your local Michigan State University Extension county office.
In most cropping systems, sampling the soil every two to three years will provide enough information for sound nutrient management. Sandy soils with low cation exchange capacities can rapidly lose nutrients to crop removal or leaching, and as a result should be sampled more frequently. Due to the unique nutrient needs of many vegetable crops, it is recommended that fields with vegetables in the rotation be sampled at least every other year.
Sample submission
The Soil and Plant Nutrient Laboratory at Michigan State University offers two basic soil analysis services. Homeowners and gardeners can purchase a soil test self-mailer kit from their county Extension office for $25. This service includes a sample bag, postage paid envelope, complete lab analysis for pH, phosphorus (P), potassium (K), calcium (Ca), magnesium (Mg), organic matter, soil texture and sulfur, as well as custom fertilizer and lime recommendations.
Commercial producers can purchase a soil sample box for $12. This service includes a basic soil analysis and report indicating nutrient concentrations and needs. The basic analysis package tests for pH, lime requirement, P, K, Ca and Mg, but a wide range of other analyses can be run at an additional cost. Fertilizer recommendations are not automatically generated for commercial producers, but can be obtained upon request from your local agriculture educator at no cost. Results from both the homeowner and commercial soil test services are usually returned within two weeks of sample submission.
Following the soil sampling procedures discussed above will help you collect a representative sample. Good samples improve the accuracy of analysis and fertilizer recommendations, providing a strong foundation for successful nutrient management.
For additional information on these sampling strategies, see MSU Extension Bulletin E-498, “Sampling Soils for Fertilizer and Lime Recommendations.”


 Print
Print Email
Email

