Small Farm Manure Management Planning
DOWNLOADDecember 14, 2020 - Sarah Fronczak, Erica Rogers, and Tom Guthrie
Developing a manure management plan may seem like a daunting task, or something done by large farms, but the components of a plan can be applied to all types of farming operations. A common misconception is that manure management must be an all-or-nothing approach. This is not necessarily the truth as many plans are developed and implemented using an integrated approach. Many small farms can benefit by looking at the components of a manure management systems plan, evaluating what is feasible for your farm, and understanding what options may be available. It also enables you to develop a sustainable plan for the future by reducing environmental risk and streamlining fertilizer costs.
Before doing anything else, think about what encompasses your farm:
- Describe your farm: Identify the goals, future growth objectives, current resources, and number of animals that currently reside on your farm.
- Map land base resources: Identify the number of acres you own or lease and the number of these acres usable for specifically managing and taking care of your animal(s). Acres to exclude from this calculation would be any area where manure should not be spread or acres on which it is not feasible to spread manure such as wetlands, wooded areas, buildings, riding arena, and other areas.
By doing this initial exercise, you will get an informed perspective as a starting point.
Volume Produce
The next step is to calculate how much manure is being produced by your animals. In general, a broiler chicken will produce approximately 0.23 pounds of manure in a day. An example calculation follows:
Manure volume produced by one broiler per average growing period (48 days):
Broiler = 0.23 lbs manure/day
0.23 lbs manure * 48days = 11.04 lbs of manure/growing period/broiler
Consider having a small flock of 20 broilers: 11.04 lbs manure/month/broiler * 20 broilers = 220.8 lbs of manure/growing period/flock
If you have 14 days of downtime between flocks and 365 days per year, the number of flocks grown per year
could be up to:
48 days grown + 14 days of downtime = 62 total days
365 days/year ÷ 62 days ~ 5 flocks per year
Total amount of manure per year: 5 flocks * 220.8 lbs of manure/growing period/flock = 1,104 lbs of manure/year
Table 1. Manure Production and Characteristics
|
|
|
|
|
Nutrient Content, lbs/day |
||
|
Animal |
Size, lbs. |
lb./day |
ft3/day |
N |
P2O5 |
K2O |
|
Lactating cow |
88 lb. milk/d |
150 |
2.4 |
0.990 |
0.389 |
0.276 |
|
Gestating sow |
440 |
11 |
0.071 |
0.046 |
0.04 |
0.058 |
|
Swine – growing and finishing |
154 |
10 |
0.167 |
0.083 |
0.032 |
0.044 |
|
Horse (average sedentary & exercised) |
1,100 |
57 |
0.910 |
0.270 |
0.117 |
0.252 |
|
Finishing beef |
750–1,250 |
64 |
1.00 |
0.350 |
0.110 |
0.298 |
|
Poultry – broiler |
2.6 |
0.23 |
0.004 |
0.0025 |
0.00167 |
0.0017 |
|
Lamb – feeder |
100 |
1.05 |
0.060 |
0.040 |
0.020 |
0.040 |
Note: The values in this table will be referred to later on in this document when considering manure utilization. (Source: American Society of Agricultural and Biological Engineers [ASABE], March 2005, R2014, D384.2) The standard can be obtained by contacting ASABE in St. Joseph, Michigan. Presented as bolded text in the table is from the Midwest Plan Service Publication MWPS–18, Section 1 (2000).
What if my hog weighs 300 lbs? One logical way to determine this would be to pro-rate volume produced to the specific weight of your animal.
(10 lbs of manure ×weight of your hog in lbs)/(154 lb hog)=lbs of manure produced by your hog
Having an accurate idea of how much manure you are dealing with on a monthly basis will be extremely helpful in the planning process as well as in helping you understand if your land base resources are adequate.
Manure Collection
When considering collection of manure on your farm, try to identify all the possible scenarios of where you may potentially collect manure. Some examples appear in Table 2.
|
Pastures |
· Manure is naturally distributed on pastures by animals, and no effort is made to collect manure from pastures. This does not mean you get a free pass; manure still must be managed in some way. · Manure is broken up and nutrients distributed when pasture is clipped; therefore, the nutrients are naturally recycled by the grass. · If necessary, a chain harrow is used on hot dry days to break up manure and distribute within the pasture. |
|
Dry lot |
· Manure from dry lot is collected: daily, bi-weekly, weekly. |
|
Run-in shed |
· Manure is collected and distributed on pasture before clipping; document how many times per year. |
|
Stalled |
· Manure and bedding is collected from stalls 2 times per day. |
|
Exercise/turnout lot |
· Manure is collected 2 times per week. |
|
Riding arena |
· Manure is collected as needed. |
Now you can start to formulate the volume of manure you may be collecting from each location depending on how your animals are managed.
Example:
You have two show horses (1,100 lbs each) that are gone from the farm 45 days of the year to shows. When at the farm, they are housed in stalls or an exercise/turnout lot (average time per day = 12 hours stalled – 12 hours outside).
The formula needed for collection calculation would be:
Number of animals times the total days or time spent in that respective housing unit times the amount of manure produced within that timeframe
365 days in a year – 45 days gone = 320 days on the farm
160 days spent in a stall and 160 days in an exercise/turnout lot
2 horses * 160 days * 57 lbs manure = 18,240 lbs of manure between both exercise/turnout lots
2 horses * 160 days * (57 + 17.1) lbs manure + bedding = 23,172 lbs of manure + bedding between both stalls
Total manure + bedding = 18,240 lbs (exercise/turnout lots) + 23,172 lbs (stall waste) = 41,412 lbs total per year
The idea is to break out the time for how you specifically manage your animals (what type of housing and timeframe spent in that respective unit) allowing for estimation and accountability of manure produced and collected.
Manure Storage
When storing manure, consider how the location may affect daily task efficiency and ensure appropriate environmental stewardship practices. Additionally, the storage needs to be economically feasible to build and maintain.
- Manure storages should be easily and conveniently accessible to the area where most of the manure is produced.
- Manure management storage location should take labor and environmental stewardship into account.
- Environmental stewardship considerations may include distances to any surface water source and wells, distance from property lines, and location as related to neighboring residences.
- Labor considerations include time efficiency and equipment needed or used.
- Material of the manure storage base should be concrete or asphalt.
- Plan to keep manure contained and prevent runoff from the pile. Consider walls or concrete barriers that can direct water flow and contain runoff
If you plan to build or have an existing manure storage structure, the capacity (volume) of the manure storage can be calculated in cubic feet (ft3).
Capacity = Length * Width * Height
Refer to Table 1 that shows how much manure can be produced per day. Realistically, consider how manure will be managed or removed (every month, every six months, or every year). Then build a structure to the appropriate (or even excess of 20%) volume carrying capacity.
Capacity needed = Number of each animal species (cubic ft produced) * Number of days before removed
Stockpiling Manure
Temporarily stockpiling manure on the ground is an acceptable practice with appropriate management. The following points for this practice are outlined in the 2020 Michigan Generally Accepted Management Practices (GAAMPs):
- Rotate locations, completely removing manure from the location annually or more frequently.
- Seed the previous location after removal to allow vegetation to take up the nutrients that have accumulated in the soil.
- Keep stockpile locations vegetated without stockpiled manure for a minimum of three years before reusing the site.
- Choose manure stockpile locations that do not allow runoff to flow onto neighboring property or into surface waters.
- Keep manure stockpiles at least 50 feet away from property lines or 150 feet from nonfarm homes.
- Keep records documenting timing of removal and the location used.
(Michigan Department of Agriculture and Rural Development, 2020, p. 8)
If you lack other options, large dumpsters may be a viable option for some, especially during the winter months of the year. This type of manure storage, which includes removal, can be expensive. However, if you consider this option, choose a location where driveway accessibility is appropriate for the truck to pick up and deliver dumpsters during times of the year when weather is inclement.
Composting Manure
Spreading raw manure in combination with soiled bedding (stall waste) on your pasture is not an advisable practice. Spreading raw manure on your pasture or crop fields may spread parasites and weed seeds. Barn waste with wood products such as sawdust or wood shavings can deplete the soil of nitrogen (needed for grass to grow) due to the breakdown of carbon. This can result in an undesired outcome when attempting to grow forage. For reference, grass clippings have a carbon-to-nitrogen ratio (C:N) of approximately 17:1. The C:N of sawdust or wood shavings is approximately 500:1.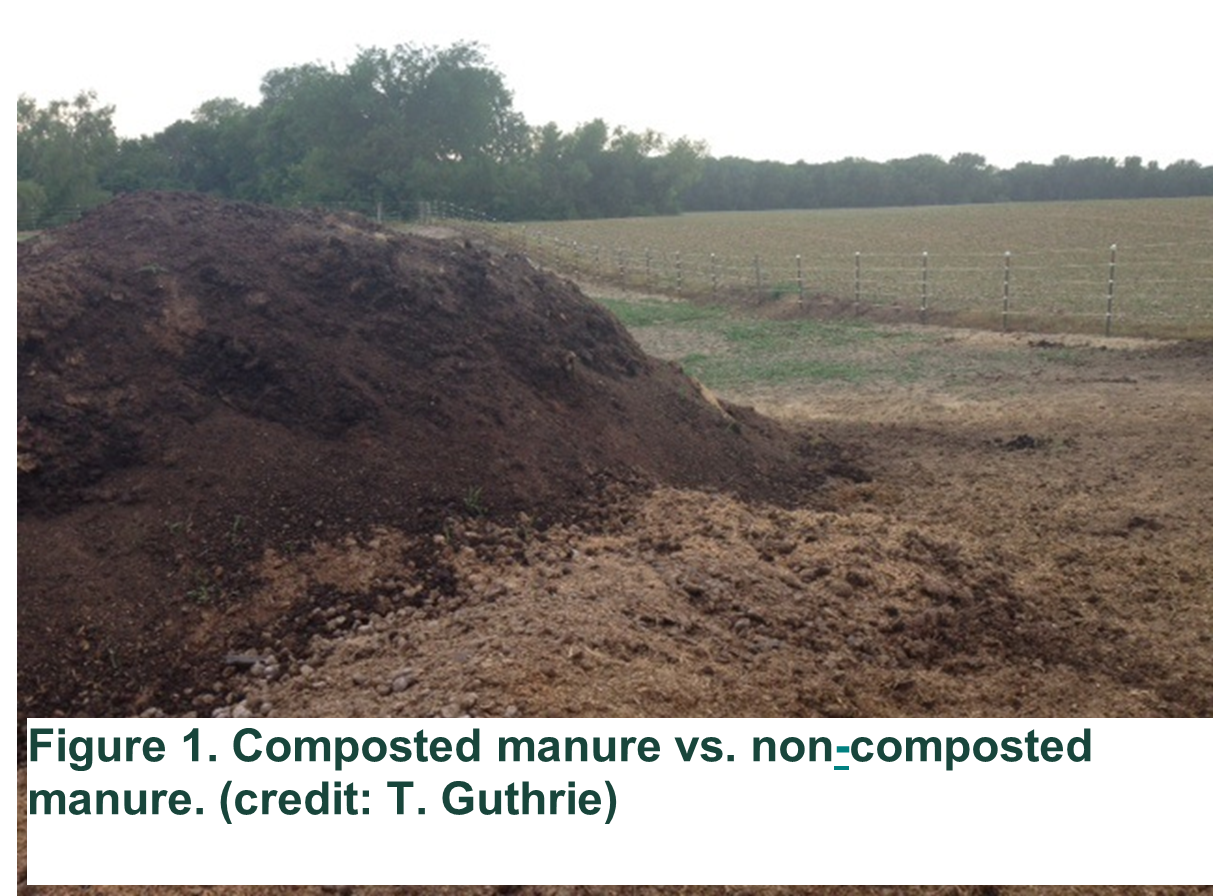
Composting is the managed biological decomposition process that converts organic matter into stable, humus-like material. Microorganisms, including bacteria and fungi, break down organic components of manure and bedding into smaller particles. The resulting compost is a dark, earthy-smelling product like potting soil. (See Figure 1.)
Four key factors will determine the success of your composting efforts:
- A carbon-to-nitrogen (C:N) ratio between 15:1 and 40:1. Less bedding in the compost results in a faster
 process. If you need to add nitrogen to the mixture, you can accomplish this by adding higher N content materials such as grass clippings (17:1), wasted hay (15–32:1), or N fertilizer to the pile (1 lb of urea nitrogen per cubic yard of collected waste).
 - A moisture content range of 40 to 60%. Generally, compost should be moist to the touch. When you squeeze a handful of compost, it should feel like a damp sponge. If the pile is too wet, aeration or turning, mixing, or moving the pile must be done to restart active composting. If too dry, water should be added, preferably by a uniform, consistent spray.
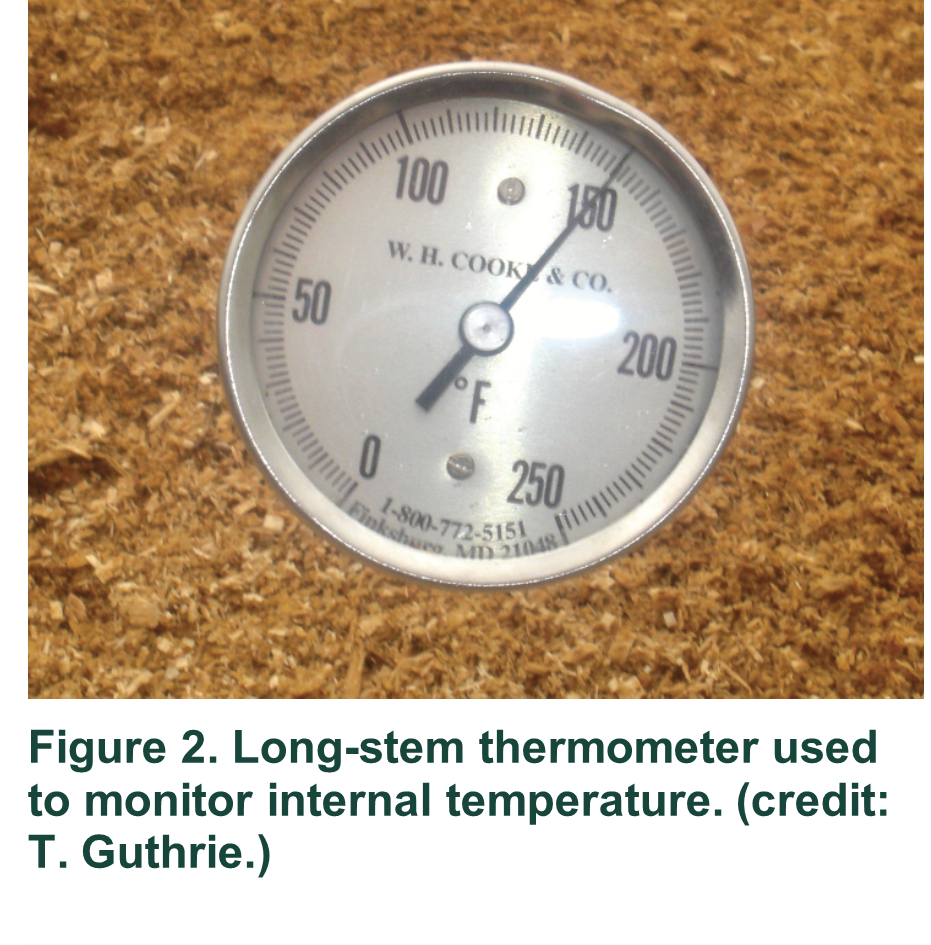
- A temperature range of 100 to 150 °F. The rise in temperature is a result and an indicator of composting activity and microbial respiration. Temperatures within this range enhance microbial reproduction. At 140 °F or higher, pathogens, weed seeds, and fly larvae in the composting materials are destroyed. Low temperatures can be caused by too much or too little moisture, lack of oxygen, an inappropriate C:N ratio, or one, two, or all of these factors. Temperatures above 150 °F kill composting organisms and, therefore, are not desirable. Use a long-stem thermometer to monitor internal temperature. (See Figure 2.)
- An oxygen concentration greater than 5%. Aeration by turning, moving, or mixing the compost batch promotes the growth of hardier, more robust aerobic bacteria by infusing air into the materials and providing a desirable oxygen concentration of 5–20%. (Guthrie & Rozeboom, 2012)
Other considerations
|
Advantages of Composting Animal Manure |
|
Reduces manure volume by half |
|
Kills most parasites, bacteria, and weed seeds |
|
Breaks down bedding material |
|
Stabilizes nutrients into a product that can be used to enrich soil |
A concrete base is an excellent choice for composting, as it is easy to clean and maintain, though having an impermeable surface of any kind is desirable. Additionally, a concrete base can help prevent the leaching of nutrients from the compost pile into groundwater. A base such as gravel, sand, wood chips, or other materials is not recommended because it may make mixing and turning the material difficult.
When selecting a site for composting manure, always remember to follow environmental stewardship practices and be aware of factors such as prevailing winds, distance to property lines, wells, neighboring residences, slope of the site, and distance away from any surface water.
Manure Transfer and Application
Whether you are moving manure directly to a storage facility, transferring manure to a field for temporary stockpiling, or applying manure, you must understand the type of spreader or equipment you plan to use. Consider how much manure the spreader can hold and how you plan to put manure into the spreader (using a tractor with a loader bucket to pull manure from the designated manure storage, cleaning a stall out directly
into the spreader, or other methods). Furthermore, planning an efficient route to and from the manure storage makes the storage easier to use. A route to the field for manure application must also be planned. The route should avoid sensitive areas such as surface water and wetlands, limited-weight traffic roads, and sensitive neighboring facilities such as schools and hospitals.
Manure can be considered a low-cost fertilizer source, which may allow for a reduction of commercial fertilizer. Proper transfer and placement of manure will ensure success in getting manure nutrients to appropriate locations. With this in mind, take these manure application considerations into account:
- Slope and drainage of fields: Consider how much of a slope exists and how likely the manure is to run off.
- Weather forecasts and seasonal conditions: Pay attention. Conditions will differ in the spring and fall.
- Snow and water saturation levels in fields: Examine field conditions. If the ground is wet, this can cause issues with ruts from tractor tires, compaction of the soil, and possible runoff of manure nutrients.
- Soil and manure analysis results: Know what the nutrient levels are in the pasture or field before applying manure.
Timing and Practice
In addition to application practices and soil and manure analyses, take timing and application conditions into consideration as shown in Table 3.
|
Application Condition |
Recommended Practice |
|
Within 150 feet of surface waters/areas subject to flooding |
|
|
Grassed waterway |
|
|
Saturated soils |
|
|
Sloping ground > 6% |
|
|
Frozen snow-covered solid |
|
(Source: Best Environmental Management Practices: Farm Animal Production, Land Application of Manure and Environmentally Sensitive Field Characteristics, Table 2).
Keeping an eye on the weather forecast is necessary when applying manure. The Michigan EnviroImpact Tool will help aid in your manure application decision (Figure 3). This tool allows the user to see if there is the  potential of nutrient runoff in the case of precipitation, snow melt, or saturated soil. By using the Michigan EnviroImpact Tool as a decision support tool, you can better plan your manure application, helping to keep manure on the field, which will save you dollars while protecting the environment.
Soil and Manure Analysis
Manure utilization involves the nutrient balance of the manure, soil, and crops and may involve other options of dealing with manure off the farm.
Michigan State University Extension recommends conducting a soil analysis before manure application takes place. Soil analyses are relatively inexpensive and are relevant for three years. A soil analysis allows you to identify the nutrient levels in a pasture or field. Additionally, you can identify the concentration of nutrients in the manure. Commonly, nitrogen (N), phosphorus (P), and potassium (K) are analyzed in both tests. By understanding these analyses, a nutrient balance can be found allowing for maximum yield of the crop being grown, maximum economic benefit, and reduced environmental risk from possible runoff of manure nutrients. This is also important if applying manure to pastures.
According to the 2020 Manure Management and Utilization GAAMPs, the following practices should be followed when applying manure:
- In fields with over 150 parts per million (ppm) of phosphorus, no manure application is allowed.
- In fields with between 75 to 150 ppm of phosphorus, the manure application should be based on crop removal.
- In fields with below 75 ppm of phosphorus, manures should be applied to meet crop N needs.
(Michigan Department of Agriculture and Rural Development, 2020)
The typical key nutrients involved with nutrient balance, N, P, and K, tend to have the greatest impact on soil health and growth of a pasture or crop. Testing the soil will help to give an indication of the soil’s nutrient levels. Testing the manure shows the nutrients that can potentially be applied to a pasture or crop. Applying manure to meet the N needs of a crop is ideal, but if the nutrient saturation in the soil has too much P, this can result in loss of nutrients since the soil won’t be able to retain the nutrients and the crops will not use enough of the nutrients. This is where economic and environmental concerns come into play. Let’s take a look at an example.
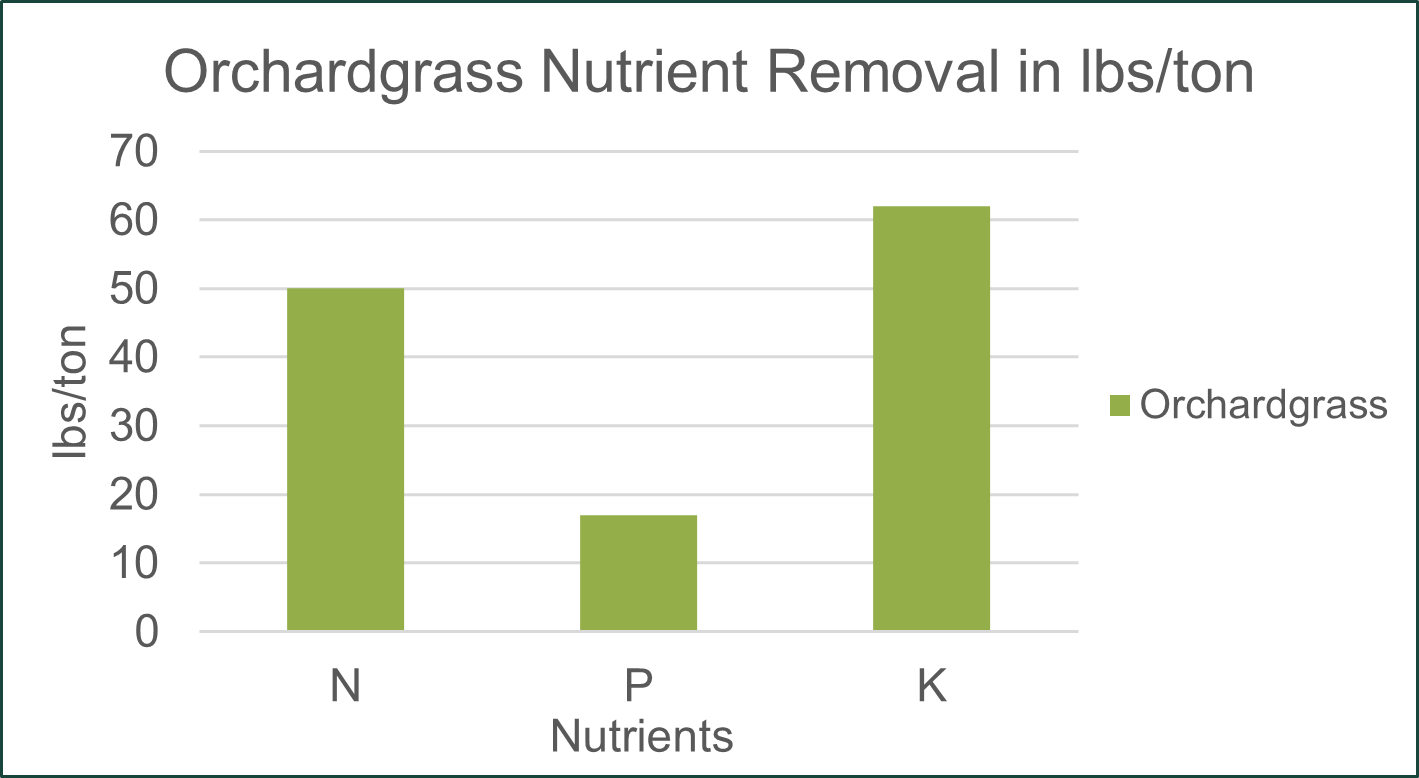
When applying horse manure to meet the soil phosphorus replacement needs after Orchardgrass is grazed (harvested), the N needs of the soil may not be met. To get the best stand or crop it is important to understand the nutrient needs of the crop. Consistent manure utilization practices build-up the organic matter in the soil, which produces a healthier crop or grass stand.
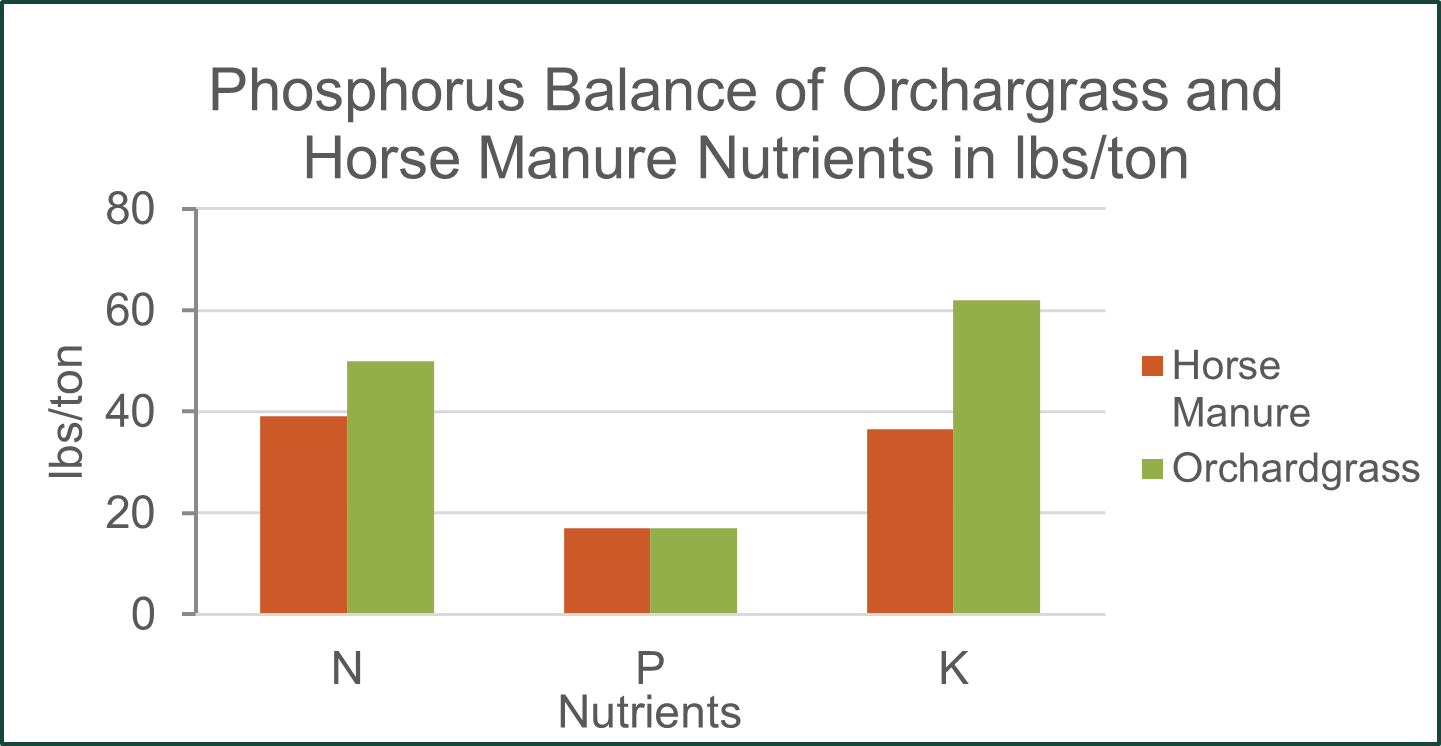
To avoid overloading the soil with P, consider the 2020 Manure Management and Utilization GAAMPs any time you apply manure to a pasture or crop. Get a soil and manure analysis to prevent oversaturation of nutrients in the soil. Oversaturation of nutrients can lead to nutrient runoff and leaching, along with soil nutrient imbalances. Soil nutrient imbalances cause improper growth of pasture and, therefore, unsuitable nutrient intake by horses and other animals. Rotational grazing can also be an important and valuable resource to keep the soil and the pasture, healthy. Rotational
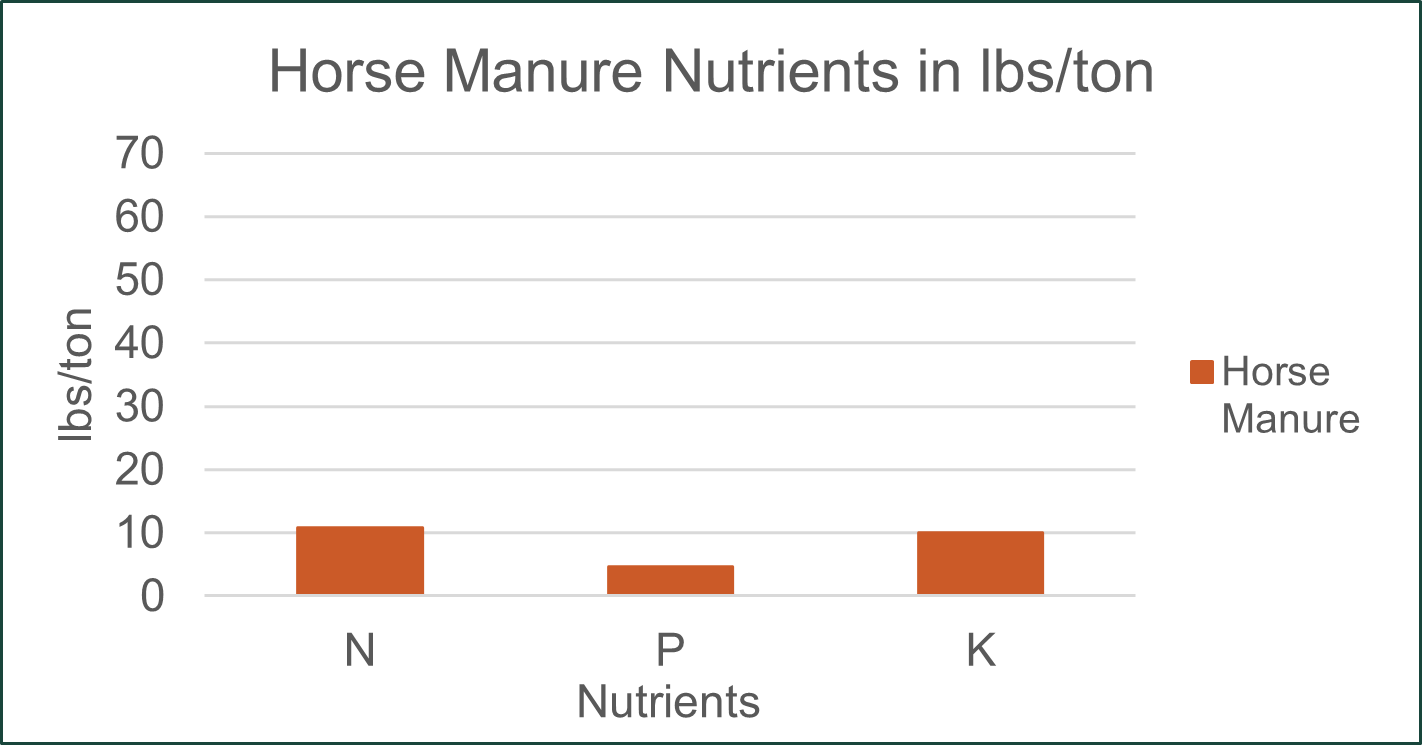
grazing allows for even spreading of nutrients by the animal, even grazing, and reduced wear.
Options to move manure off the farm may be necessary if nutrient concentrations in the soil are too high:
- Compost manure and sell or give away.
- Sell manure as is or give away to those who can utilize the nutrients.
- Store and remove from property in large dumpsters.
Odor Management
Understanding why manure smells and choosing appropriate manure spreading times will help any farm owner be a good neighbor and an excellent manure manager. So, what is it about manure that produces an unpleasant odor?
Measurements and characteristics that contribute to the odor of manure include:
- Concentration: identified by the odor detection threshold (ODT) (the volume of non-odorous air divided by the volume of odorous air)
- Intensity: the strength of an odor
- Persistence: how easily a full-strength odor is diluted below the ODT
- Hedonic tone: the pleasantness or unpleasantness of an odor
- Character descriptor –type of odor detected (floral, fruity, earthy, fishy, or other) (Rogers, 2018)
Although manure can be spread any time throughout the year (though, not recommended during winter months as discussed earlier), there are opportune times to spread and times that should be avoided to reduce unpleasant odors.
- A good time to spread manure is in the morning. As the day goes on, warm air rises and carries odors up and away from the ground. Spreading in the morning once everyone has left for work can help with neighbor relations.
- A breezy, cooler day disperses odors, unlike warm, humid days. Incorporate manure within 48 hours (unless applied to alfalfa).
- Avoid spreading when the wind is blowing in the direction of residential areas and on weekends or holidays due to the increased potential for people to be home or having larger gatherings.
Other practices also ensure good standing with others in your community:
- Notify your neighbors that you plan to spread. Studies have shown that neighbors who knew a producer tended to notice less odor when spreading manure (Mikesell et al., 2004).
- Keep the area clean. People sometimes smell with their eyes, so having a clean and aesthetically pleasing area may help with odor issues.
- Plant some trees. Take advantage of vegetation barriers such as trees or woodlots. If you have none, put some in place around fields where you spread or store manure. (Rogers & Guthrie, 2018)
The 2020 Manure Management and Utilization GAAMPs encourage the following practices related to odor management of manure:
- If building a new facility for animals or a manure storage, do not locate near neighbors.
- Remove manure for stalls and paddocks into appropriate storage located away from neighbors.
- If stockpiling manure, consider a cover (tarp, straw, or similar cover) or a covered dry stack storage.
- Properly compost to reduce odors and flies to maintain positive neighbor relationships.
(Michigan Department of Agriculture and Rural Development, 2020)
Plan ahead and consider how the odor from manure has the potential to be a nuisance. By following some or all of these practices, the manure odor can be effectively managed, making you a good neighbor in your community, and your home and farm a place that everyone wants to visit.
Emergency Spill Response: Areas Where Manure Spills Are More Likely to Occur
Although manure is not commonly involved in large spills, you should have an emergency spill response plan in place, considering human safety as well as environmental safety. While manure spills are thought of as occurring on roadways, they can occur as a result of manure overapplication especially if a large rain or snowmelt event happens shortly after applying. Areas and occasions in which manure spills commonly occur, as shown in Practical Considerations for Solid Manure, are the loading area or transfer area, local transport, long distance hauling, and field spreading or land application (Wilson, 2010).
Prevention is the most important way to avoid a possible manure spill. The 4Rs of nutrient management serve as a guide for prevention planning.
Practice additional prevention techniques at these areas where manure spills are most likely to occur:
- Loading area: Keep the loading areas around storages and stalls as clean as possible.
- Local transport: Only fill spreaders to their potential (what the specs from the manure spreader manufacturer state they can hold) and do not overload; inspect equipment before using to make sure everything is in proper working order.
- Long distance hauling: If using your own vehicles or equipment, follow the same procedure as local transportation.
- Field spreading/land application: Overapplication of manure to a field can turn into an emergency response situation, especially if a large rain or snowmelt event occurs shortly after application.
Should a spill occur, follow these spill response steps:
- Put human safety first. This is always the number one priority. Make sure that everyone involved in the situation is safe and has received medical attention if needed.
- Control the spill at the source.
- Contain the spill. Keep the manure in one area if possible and prevent it from flowing into nearby surface waters. Consider damming up an area using dirt or utilizing straw or hay bales as a buffer to absorb manure.
- Contact the appropriate authorities. In Michigan, contact the Michigan Department of Agriculture and Rural Development (MDARD): 800-405-0101 and/or the Michigan Department of Environment, Great Lakes, and Energy (EGLE): 800-292-4706.
- Clean-up the spill.
- Document the spill. This serves to protect you as it is proof that you made a concerted effort to minimize any associated environmental risk.
Records and Record Keeping
Record keeping is as an essential management tool and serves as a baseline for all aspects related to taking care of animals, including animal manure management. Knowing how much manure is produced; how it is stored; and when, how, and where it is applied, utilized, or transported are key components to developing a sustainable manure management plan for your farm in the future.
Creating a record-keeping system may seem like a daunting endeavor, but it does not have to be. Finding a documentation method that works efficiently for you is the first step. This can be as easy as notes in a three-ring binder, on a calendar, in an App, on your phone or computer. Your records should be easy to read and easily understood by someone else. They should have the capability to be printed or copied.
Tips for record keeping:
- Document the actions you take to implement your manure management plan.
- Include information such as soil and manure lab analyses, and manure and fertilizer spreading details by field, crops grown, and yield by field.
- If composting manure, document the amount of manure, the temperature of the pile, and the date it was turned or aerated, moisture added, rainfall, or anything unusual that occurs.
- If applying manure, document the date, time, air temperature, number of loads, acres covered, and wind direction.
- If temporarily stockpiling, record the amount stockpiled for each respective month.
- If manure is being picked up by someone off the farm, document the date and amount transported off the farm.
An example record keeping form follows.
In the end, consider thinking of your manure management records and record keeping in this way:
Commit to documenting manure management practices in a way that holds you
Responsible for managing manure in an appropriate way. This will hold you
Accountable for the by-product that your animals are producing and will help you avoid any
Problems in the future.
References
Frankenberger, J.R. et al. (n.d.). Best environmental management practices: Farm animal production, land application of manure and environmentally sensitive field characteristics. https://www.canr.msu.edu/uploads/resources/pdfs/Land_Application_of_Manure_and_Environmentally_Sensitive_Field_Characteristics_(E2821).pdf
Guthrie, T., Rozeboom, D. (2012). Carcass composting: A mortality management option for Michigan equine owners. Michigan State University Extension. https://www.canr.msu.edu/resources/carcass_composting_a_mortality_management_option_michigan_equine_owners_e31
Michigan Department of Agriculture and Rural Development. (2020, January). Generally accepted agricultural and management practices for manure management and utilization. https://www.michigan.gov/documents/mdard/Manure_Management_and_Utilization_2020_GAAMPs_682465_7.pdf
Mikesell, R. E., Kephart, K. B., & Abdalla, C. W. (2004). Overview of social issues related to the swine industry. University of Illinois Extension. http://livestocktrail.illinois.edu/uploads/sowm/papers/p1-11.pdf
Rogers, E. (2018, April 19). What factors influence the odors in manure? Michigan State University Extension. https://www.canr.msu.edu/news/what_factors_influence_the_odors_in_manure
Rogers, E., & Guthrie, T. (2018, November 15). An 8-step process for developing a horse manure management plan: Part 7 – Odor Management. Michigan State University Extension. https://www.canr.msu.edu/news/an-8-step-process-for-developing-a-horse-manure-management-plan-part-7-odor-management
Wilson, M. (2010). Practical considerations for solid manure [PowerPoint slides]. University of Georgia. https://lpelc.org/wp-content/uploads/2019/03/10julPPWilson.pdf


 Print
Print Email
Email


